Friday, August 26, 2011

Not much done today, but still progress...

Today and Yesterday I have been doing small things to the plane. i haven't had much time to play, but so far I have done:

Welded axles for the steerable part of the plane

Started the wing joiner sections with plywood


Reinforced the new vertical stabilizers with CF rod/glued halves together

Glued a hinge mounting plate in the nose

Shaved down more foam, making the upper section of wing almost done!!!

Sanded down some filler and hinged a servo access door for the aileron control servos

started plotting the MLG locations, I am pretty sure I know where everything is going.

So far she is looking like she is ready to breathe at 500Ft.!!!

Next:


need to make aileron links, mount landing gear, finish wing wiring, install ESC,EDF,motors, mount vertical stabs, rudders, more foam, then a test flight!!! lol not much left!!!

Friday, August 19, 2011

Me and the Hobby Zone Ultra Micro BNF Piper J-3 Cub....

Last year for my birthday I received the HZ ultra micro J-3, and I was amazed. Being my first radio control plane I did what any newbie would do.... took it right outside and flew it. I opened the box, charged a couple of the batteries, and bound the radio to the plane. Nice and easy, but like i said I was a newb. I took it outside, figured out which was the wind was blowing, and with my Father in-law watching plowed right into the grass. ..............................Well, that didnt last long........... 15 seconds if I remember correctly.

I bought some replacement parts. a new prop, prop shaft and nut, and cut the crumpled nose apart and fixed it. Excited, I took it right outside and guess what? crashed it again.................... Ffffffffffffuuuuuuuuuuuuuu................................... prop shaft broke, AGAIN.

This happened 3 more times and i went mad. i look on forums and found that this is a problem with these planes. the prop shaft just isn't meant for rough abuse. It is INCREDIBLY skinny.

I found a forum where, to my astonishment, people found a FIX for it!!!! yay!!!!! 6 pros/shafts later, i found it!!! Surprisingly simple, By the way. You take the motor/gearbox and prop shaft from the HZ Ultra Micro P-51D Mustang, and just replace mine with it. Nice!!! So hereis how I did it, taking me an hour and about 20$. (each crash cost me 7$ in parts with the old setup)

Carefully cut open the fuselage along the seams on the side and just infron of the vertical stab (rudder)
after seperating the two halves, you will see the gearbox glued in with some weird silicone or something. cutting around the glue, remove the old gearbox and set aside.

Next hog out a TINY bit of the foam to make the bigger, more robust rig fit right in. notice the difference in size of the gear AND motors:

trim the gearbox mounting tabs, and glue the new one in, maintaining the prop thrust counterbalancing angle of about 2-3 degrees. you will see how much of an angle it was with the old motor in place.


glue the top and bottom halves back together (NO CA GLUE!!!!!!) with some elmers wood glue or foam glue and install the new prop. You are all set!!! after the glue dries, take her for a spin. I noticed some MAJOR changes once i did this conversion:

after a crash, (right into a tree mind you) the prop was undamaged! everything worked, and i hand-launched it right after.

It flies much more balanced. The nose was so light it used to fly tail-heavy, and overall made for a difficult plane to manage. Now, all is well!

It steers with a rudder only, so remember you will not have a slower reaction time for evasive maneuvers. there is a mod for adding ailerons also, using the HZ P-51 receiver and servos. Meh. I like this little bird as-is.

It takes off IMMEDIATELY. you can almost hang the plane on the prop, and run time is hardly affected at all, since you hardly need any power to keep it in the air. Hand launching is NO PROB.

I use a DX5e radio, so my trims have to be set up every time i switch planes. no problem with the cub. after a hand launch and getting her in the air, you can trim it until she just glides.

So if you have this little pipsqueak of a plane or plan to buy one, just follow these steps. You should be enjoying the flight once again! below is a link for the parts you will need:

motor and gearbox:

http://secure.hobbyzone.com/search/PKZ3624.html


prop:

http://secure.hobbyzone.com/search/PKZ3601.html

Some Wing Work....

So today I did alot. I started filing down the tail sections I completed yesterday, and started filling in cracks with lightweight spackling paste. I am going to look for a better filler paste, more flexible and easier to apply.
Afterwards i took the wing inside and worked on putting in the aileron and flap servos, and running some preliminary wires for the servo extension harnesses. I glued some temporary aileron control horns, which will be removed and re-attached later once the test flights are completed, and the plane is covered.
Lastly I finished up the elevators with some depron covering, and sandwiched 2 carbon fiber rods between the layers of foam to keep the elevators from bowing.


I will start the next step with trimming the foam on the wings, and adding as I go. what I have left in the near future is:

Landing gear and linkages

elevator linkage (might change to a braided wire, not sure)

nose hinging and lock

servo access panels on tail, wings, and nose.

mounting the 6 EDF fan units and shaping/mounting of the jet nacelles.


That should be it for now, I will see you all on Tuesday!!! (Monday if i am lucky)

Thursday, August 18, 2011

A backstory...

I was in a hurry to post the curent state of what my plane has become, but now i should give you some backlog. I fell in love with this plane when I started to hear about it being "the world's largest plane", and "the only one of it's kind". And this is true- there is only one like it in existence, and the other frame that was destined to be another Antonov-an-225 looks like... well, this:
This particular photo is of the second AN-225 Airframe at Gostomel Airport in Kiev. This plane was supposed to sport the large cargo door in the rear of the aircraft as well as the lifting nose and dropping nosegear assembly for front-or-back cargo loading. unfortunately, the Antonov Design bureau has not had a need for such an incredible aircraft since the fall of the Soviet Space Program, so only one is still in existence.

The AN-225 is a beast. According to the website ( http://www.antonov.com/products/air/transport/AN-225/index.xml ) the maximum payload is a whopping 250 Tons. sporting 32 wheels, 6 engines, and a dizzying height of 18 meters, (over 59 feet) and a wingspan of 88.4 Meters (290 feet) she dwarfs pretty much anything near her. Nicknamed Mryia (dream), she performs quite well hauling anything that would not normally fit into her sisterships, the an-124 Rusian to practically anywhere in the world. When she first popped out of that hangar barely big enough to contain her, she was ready to haul the Buran shuttle on her back, anywhere that had at least a 10,000 Ft. runway.
I Instantly fell in love. It is a beast, yet she flies gracefully through the air like a giant hawk. Never crashed, and a real display of what humans really are capable of if they put their minds to it, I was impressed. A 1.5 Million pound maximum takeoff weight (after her floor was rebuilt to accomodate it) and enough room for not 2, not 3, but 5 battle ready tanks, crew, and supplies!!!! (http://www.historyofaircargo.com/i--Antonov-An-225-with-five-main-battle-ta.html)

I set out on a mission. I wanted to make a model of her. I got all the research I could, measurements, and scale drawings, and went to town. This image helped alot:

(thank you to whoever slaved in making it, I was able to get everything i needed from it)

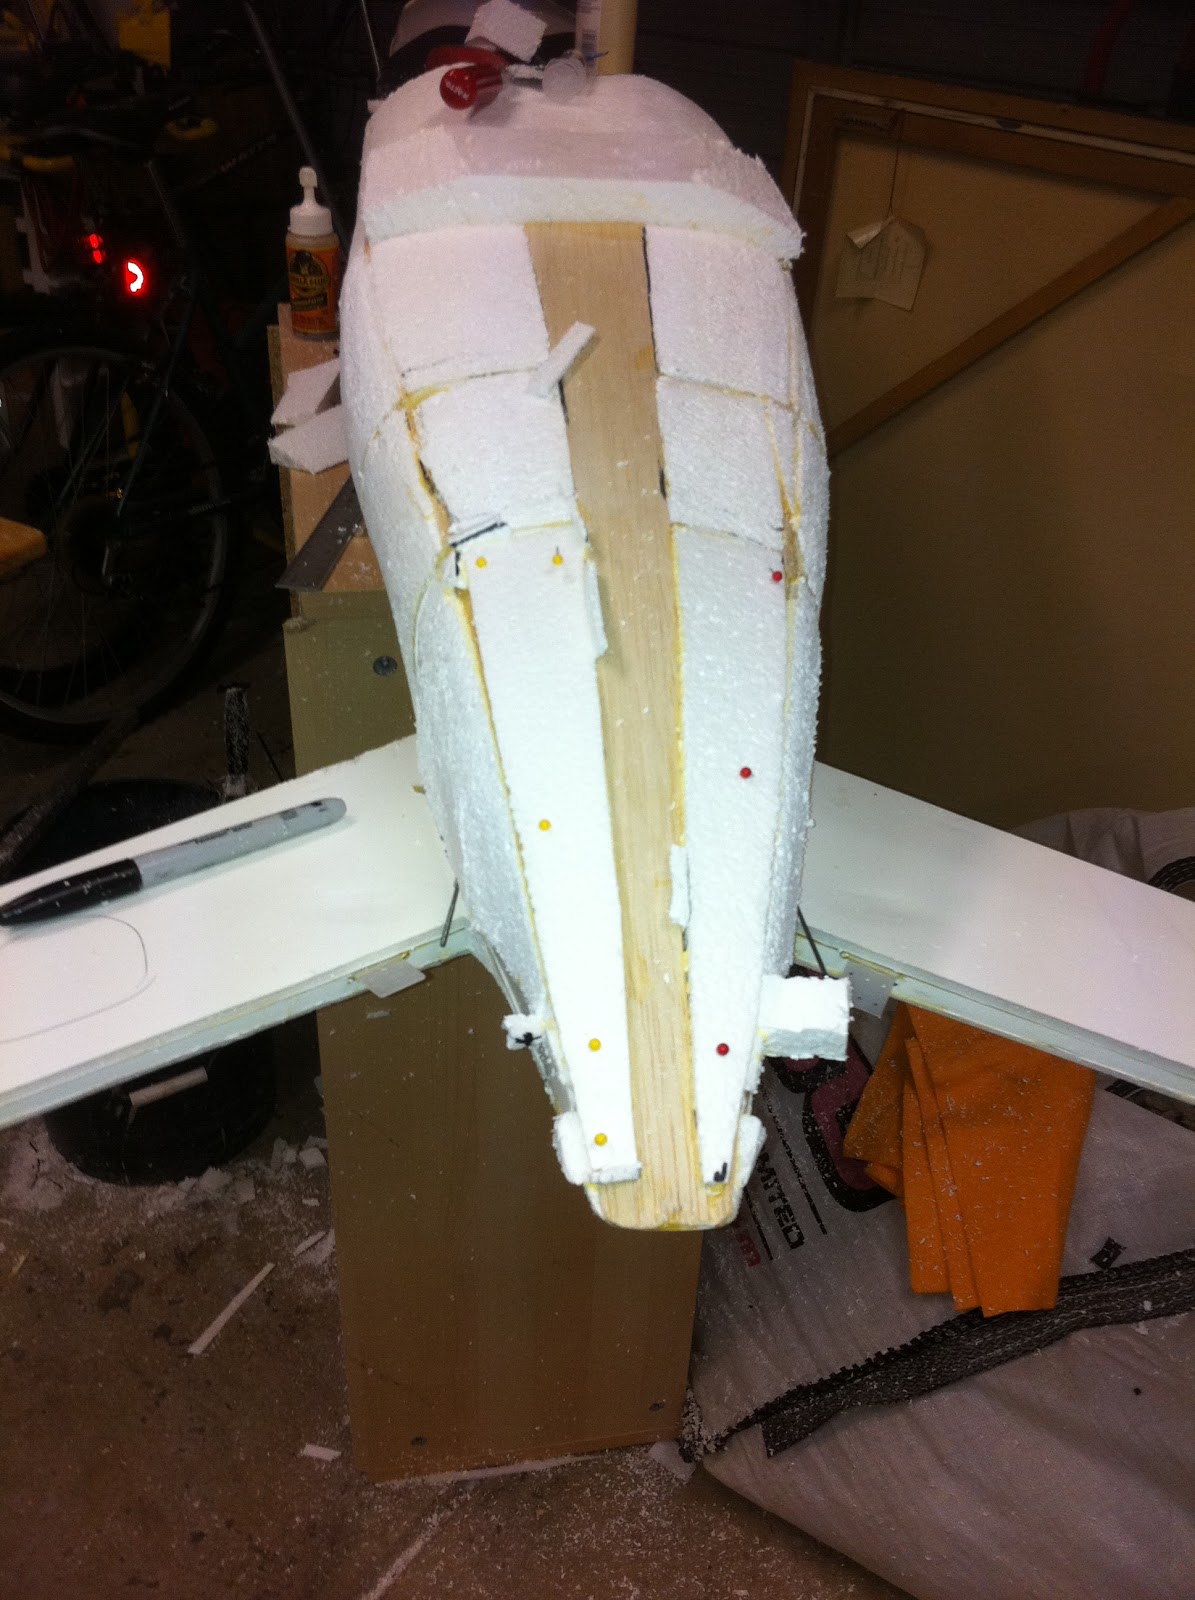
I started by cutting out the skeleton from 1/4" foam core posterboard.

Then filled in each area carefully with 1/2" or 2" foam, shaving down for shape and adding reinforcements when necessary.
After shaving each chunk of foam down with a body planer, I used 320 grit sandpaper to smooth her out. eventually i ended up with a wing too:
After going through about 1 1/3 sheets of extruded foam insulation I ended up with a bulked-out skeleton, forming an abruptly-shaped version of the graceful AN-225.
About 2 months of daily work went down, and eventually life happened. So I had to hang her up for almost a year. There she sat, motionless but intimidating, beckoning every time i passed her to let me work some more on her. She had blocky wings, a crude fuselage, and a layer of dust to show how i had put her away like a christmas ornament, only this time not knowing when I would extracate her.

About a month ago i was working on HHO theory, including a crudely made generator and an almost-would-be pulse width modulator, and I looked up. There she hung from the cieling, dirty, lonely, but still possessing that magic I saw when I last put her there one year prior. I decided to bring her down, and finish what I started, making sure my efforts did not go to waste.

So here she is" the Antonov AN-225 Mryia, almost there, taking shape, and certainly large enough for my garage. I cannot work on her on a bench. It is just too large of an aircraft. Even at her tiny scale, a 98" wingspan is just far too great for my office. So now you have the full story. I will update you as much as I can between baby feedings, work schedules, and eventually spending time with the family, but just know this: She Will Fly.

Aft section almost complete!

So today I finished foaming up the tail section, installing electronics, servos and extensions, and finally set the last piece of foam in place. this means I can work on the vertical stabs, since there will not be any complicated rigging in the way. I have been shaping alot of foam while listening to different books of Harry Potter, and I have noticed a few things...

First, I am using 3 digital servos for nosegear/elevators, and 2 analog servos for Rudder. I powered up what I have connected so far without any linkage connected, and found some buzzing of the servos. this doesnt concern me much, but today I also noticed the 2 cheepy-cheep servos I put in the tail for rudder control are chattering and not centering properly. I will test some more before i tape them in, but in the meantime pics!

This was the wing sections all together waiting for wingtips
Wings, wingtips, and a CF rod about to be embedded in the foam

Fiberglass tubes (heli pieces) being attached with gorilla glue.
Yay today!!! Finally finished filling in foam for the aft section.  This makes the tail almost completely filled in! just need to cut servo access doors and make new vertical stabs, and I am set to finish up the wing!


Tuesday, August 16, 2011

Hard thing to do....

Well, I ended up cutting off the vertical stabs today, since I could not make the plane work with them. I am making new stabs/rudders with a stronger and better to control design. I am ultimately trying to keep the model as scale as possible, without sacrificing flight quality. I also was able to fill in some more foam, and start with my servo y-and extensions. Unfortunately I decided to place the rudder servos close to the tips of the horizontal stabs for ease of linkage hookup, and with 9g servos they should work just fine. Pics and more info soon!

Saturday, August 13, 2011

Waiting....

So another weekend has come and gone, and now we get back to the daily grind. I mis-stated in my last post there would be 4 motors this is incorrect. 6 motors, fans, and esc modules. Hopefully only 3 batteries, as I am afraid 2 (even with a higher mAh and C capacity) just won't cut it. I am currently working on the tail section, dual rudder and elevator bellcranks. I still need to wire up the main part of the fuselage and wings with servo wire. More tomcome soon!

Thursday, August 11, 2011

So what has started essentially from a skeleton of pure foam core posterboard has, over a year later, become a radical combintion of many materials such as balsa, florist's foam, styrene foam, fiberglass and carbon fiber rods, and ALOT of patience. The end result hopefully will be a scale replica of the Antonov AN-225 monstrosity. at almost a 10 ft. wingspan the scale is actually on a "micro" definition when compared to similar models. I have determined it to be 1/27 scale, and so far she weighs in at a whopping 4.2 pounds, including 4 servos installed already. alot of this weight will e shed as I scrape off chunks of foam, and wood used for structure. Since I am only using 4 64mm edf fans for the propulsion of this project, i need it to be as light as humanly possible, also considering she has 32 wheels, 6 engines, minimum calculations require 3 lipo batteries, and 6 servos minimum.


I will post as I go, but be warned I cannot fully catch everyone up in one furious session. I will reminisce as i go, posting facts from past experiences with a hint of "If I knew then what I know now".
This is what she looks like now, and as we speak the glue is drying on a brace for the elevator and rudder servos. more pictures to come shortly, enjoy!